시작하기 전에 필요한 것들
1. 보여주고 싶은 여러개의 사진들

과정 1.
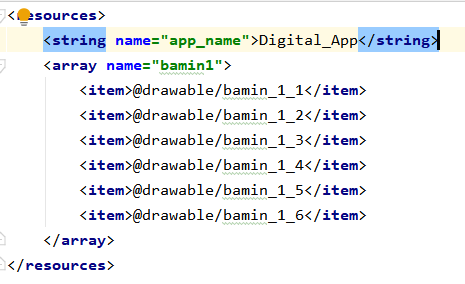
- res > values > string 의 xml 파일 연다.
- 그 후에 돌리면서 보여주고 싶은 여러 이미지를 아래 코드처럼 작성하여 삽입한다.
<array name="bamin1">
        <item>@drawable/bamin_1_1</item>
        <item>@drawable/bamin_1_2</item>
        <item>@drawable/bamin_1_3</item>
        <item>@drawable/bamin_1_4</item>
        <item>@drawable/bamin_1_5</item>
        <item>@drawable/bamin_1_6</item>
</array>
이때 name = "이 배열의 이름" 은 자신이 원하는 이름을 지정하면 되며 <item> 사이에는 drawable 파일에 있는 사진들의 이름을 보여주고 싶은 순서대로 나열해주면 된다.
과정 2.
이후에 사진을 넣어줄 xml 과 사진이동을 감지할 수 있는 버튼이 달린 화면을 제작해준다.
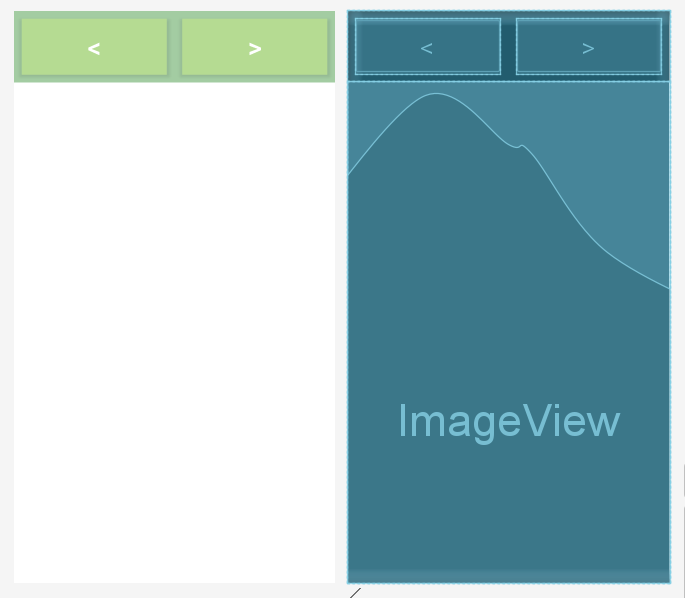
아래는 위 레이아웃 xml 코드이다.
<?xml version="1.0" encoding="utf-8"?>
<LinearLayout xmlns:android="http://schemas.android.com/apk/res/android"
android:layout_width="match_parent"
xmlns:tools="http://schemas.android.com/tools"
android:orientation="vertical"
tools:context=".KaKaoImage1"
android:layout_height="match_parent">
<LinearLayout
android:id="@+id/explane"
android:background="#FFF"
android:orientation="vertical"
xmlns:android="http://schemas.android.com/apk/res/android"
android:layout_width="match_parent"
android:layout_height="match_parent">
<LinearLayout
android:layout_weight="7"
android:background="#A3CCA2"
android:layout_width="match_parent"
android:layout_height="match_parent">
<Button
android:id="@+id/left_btn"
android:text="<"
android:textSize="35dp"
android:background="#B5DB92"
android:layout_width="match_parent"
android:layout_height="match_parent"
android:layout_margin="10dp"
android:layout_weight="1"/>
<Button
android:id="@+id/right_btn"
android:text=">"
android:textSize="35dp"
android:background="#B5DB92"
android:layout_margin="10dp"
android:layout_width="match_parent"
android:layout_height="match_parent"
android:layout_weight="1"/>
</LinearLayout>
<FrameLayout
android:layout_width="match_parent"
android:layout_height="match_parent"
android:layout_weight="1">
<ImageView
android:adjustViewBounds="true"
android:id="@+id/imagevew"
android:layout_width="match_parent"
android:layout_height="match_parent"/>
</FrameLayout>
</LinearLayout>
</LinearLayout>
여기서 imageView에 위에 배열로 만든 그림들을 넣어줄 것인데 버튼 < > 이동을 통해서 왼쪽 그림, 오른쪽 그림으로 이동시켜줄 수 있게 할 것이다.
과정 3.
자바 스크립트를 이용해서 사진 넣는 코드 제작(풀코드).
public class BaminImage1 extends AppCompatActivity {

    int i, max;
    ImageView imageView;
    TypedArray typedArray;

    protected void onCreate(Bundle savedInstanceState) {
        super.onCreate(savedInstanceState);
        setContentView(R.layout.imagetool_bamin_1);

        imageView = (ImageView)findViewById(R.id.imagevew);
        typedArray = getResources().obtainTypedArray(R.array.bamin1);

        i = 0;
        max = typedArray.length();
        imageView.setImageResource(typedArray.getResourceId(i, -1));


        Button left_btn = (Button)findViewById(R.id.left_btn);
        left_btn.setOnClickListener(new View.OnClickListener(){
            @Override
            public void onClick(View view) {
                i--;
                if(i<=0)
                    i=0;
                imageView.setImageResource(typedArray.getResourceId(i, -1));
            }
        });

        Button right_btn = (Button)findViewById(R.id.right_btn);
        right_btn.setOnClickListener(new View.OnClickListener(){
            @Override
            public void onClick(View view) {
                i++;
                if(i>=max)
                {
                    Intent choice1Intent = new Intent(BaminImage1.this, MainActivity.class);
                    BaminImage1.this.startActivity(choice1Intent);
                }
                imageView.setImageResource(typedArray.getResourceId(i, -1));
            }
        });
    }
}
하나씩 설명하자면
int i, max;
ImageView imageView;
TypedArray typedArray;

imageView = (ImageView)findViewById(R.id.imagevew);
typedArray = getResources().obtainTypedArray(R.array.bamin1);

i = 0;
max = typedArray.length();
imageView.setImageResource(typedArray.getResourceId(i, -1));
변수 선언과 화면에서 가져와 연결시키는 부분으로 레이아웃에서 설정한 아이디를 통해 (ImageView)findViewById(R.id.imagevew); 으로 객체를 찾아와주는 부분이며 우리 처음에 만든 배열같은 경우 TypedArray 타입으로 선언하여 getResources().obtainTypedArray(R.array.bamin1); 로 넣어주면 된다. 이때 R.array.bamin1 부분은 R.array.(본인이 작성한 배열 이름) 으로 작성하면 된다. 그리고 max에는 작성한 배열의 길이를 넣어주었으며 이미지뷰에 그림을 설정하는 방법은 imageView.setImageResource(typedArray.getResourceId(i, -1)); 이다.
이때, typedArray.getResourceId(0, -1) 일 경우 처음에 배열 만들어줄 때의 첫 번째 그림,
typedArray.getResourceId(1, -1) 두번째 그림 .. 이런 식으로 글쓴이 경우 배열에 있는 그림을 다 가져오기 위해 i라는 변수를 설정해주었다.
그 후에 버튼이 눌리게 될 경우, 사진이 바뀌도록 아래와 같이 설정해주었는데
1. 왼쪽 버튼을 누를 경우
Button left_btn = (Button)findViewById(R.id.left_btn);
left_btn.setOnClickListener(new View.OnClickListener(){
 @Override
	 public void onClick(View view) {
          i--;
          if(i<=0)
               i=0;
          imageView.setImageResource(typedArray.getResourceId(i, -1));
	 }
});
여기서 i--를 시켜서 만약에 2번째 그림에 있는데 왼쪽 버튼을 누를 경우 1번째 그림으로 바뀌게 해주었다. 이때, i가 0인데도 불구하고 마이너스를 시켜 -1 될 경우 사진을 찾을 수 없는 오류가 나기 때문에 if (i<=0) 일 경우에 i = 0을 유지하도록 예외처리를 해주었다.
2. 오른쪽 버튼을 누를 경우
Button right_btn = (Button)findViewById(R.id.right_btn);
        right_btn.setOnClickListener(new View.OnClickListener(){
            @Override
            public void onClick(View view) {
                i++;
                if(i>=max)
                {
                    Intent choice1Intent = new Intent(BaminImage1.this, MainActivity.class);
                    BaminImage1.this.startActivity(choice1Intent);
                }
                imageView.setImageResource(typedArray.getResourceId(i, -1));
            }
        });
왼쪽과 비슷하게 여기서는 i++를 시켜서 만약에 2번째 그림에 있는데 오른쪽 버튼을 누를 경우 3번째 그림으로 바뀌게 해주었다. 이때, 길이가 5여서 i가 4번째인 사진까지만 존재하기 때문에 i=5가 되면 찾을 수 없는 오류가 나기 때문에 if (i>=max) 일 경우에 글쓴이 경우 처음 화면(다른 화면)으로 돌아가게 예외처리를 해주었다.
만약에 마지막 사진 그대로 유지하고 싶다면 위 코드 중 if문을 아래와 같이 바꿔주면 된다.
if(i>=max)
{
    i = max - 1;
}
여기까지 만들면 아래와 같은 결과가 만들어지는 것을 확인할 수 있다.

'App && Game' 카테고리의 다른 글
| [유니티] 도트 게임 만들기 - 2일차 (특정 조건 후 자기자신 없애기 / 오브젝트 삭제하기 / Random.Range 랜덤 함수 사용하기 / 이미지가 씬 뷰에서는 보이고 게임뷰에서는 안 보일 때) (0) | 2020.12.14 |
|---|---|
| [유니티] 애니메이션(animation) 만들기 (0) | 2020.12.14 |
| [유니티] 도트 게임 만들기 - 1일차 (애니메이터 컨트롤러 파라미터 스크립트로 조절 / animator parameter script / 유니티 캐릭터 점프 구현하기 / 무한 움직이는 땅 구현하기) (0) | 2020.12.06 |
| [App 제작 프로젝트] 앱 제작 - 3일차 (0) | 2020.10.04 |
| [App 제작 프로젝트] 앱 제작 - 2일차 (0) | 2020.09.28 |


댓글